Whew!!!! I got through another end of year, with three kids, 3 home room teachers, and ANOTHER 26 rotary teachers, after care and lunch care staff, and office staff!!!!
After the round of Christmas time gift cards, I cannot possibly afford end of year gifts, but always feel that most of these people truly deserve a kind gesture of thanks for all they do for my kids and myself and husband throughout the year.
This year I decided to try out a few candy recipes I'd collected/seen over the last few months. As my #1 son is anaphylactic to tree nuts and peanuts, we LOVE homemade candy! We can never buy those yummy treats we see in gourmet candy shop windows (but thank heaven for companies like Gimbals, Divvies, Dare, Chapmans Ice Cream - without these companies, my son couldn't be like any other kid!).
Anyway, a few of the schools teachers also have these allergies, including my #2 sons teacher. So, these home made candies, made in a real peanut/nut free (except me) facility (my home) would be appreciated by many!
FIRST- BUY A WHOLE STACK OF MASON JARS:
SECOND- COLLECT RECIPES/INGREDIENTS:
1. Chocolate fudge with marshmallows and pretzel pieces. We used the Phat Cow Fudge recipe from the Blog The Girl Who Ate Everything but we substituted Pretzel pieces for the walnuts in her recipe. Its a great easy recipe but is a bit soft. Its gets a bit harder in a couple of days, so I shouldn't have made it 'fresh'. Next time I gift this fudge, I will make it a couple of days ahead.
Voila:
You don't really see the pretzel and the marshmallows are a bit chocolatey here…I must explain, this was the VERY LAST MANDHANDLED PIECE!!! It did look great, and the pretzel is a nice salty addition to the sweet fudge.
White chocolate fudge with cranberry and lemon Zest: This recipe was from the Readers Digest Website - this recipe isn't bad but you REALLY have to like white chocolate as its quite sweet, and I substituted lemon zest for the orange zest in the original recipe. Kids gave it two thumbs up!
The third recipe was for Pretzel Beer Brittle from Guy Fieri at The Food Network.
We omitted the peanuts and doubled up on the pretzel pieces. Now, I have to admit, I made this three times. The first time I didn't use a candy thermometer. I couldn't find it, and I tried to 'guestimate' 305*. Well, it didn't look great, but it tasted very good. It had a dull sheen (as in none), and was more like pretzel beer fudge, but no one lost a tooth!
The second time, I used a thermometer, and waited the half hour it takes to get to 305*!! I added 3/4 of a teaspoon of baking soda at the end, which most brittle recipes have. It made it pale and opaque. It probably was sweeter (in my imagination???) but again, no lost teeth.
The third time I did it EXACTLY like the recipe said. Reached 305* and let it cook for a few minutes at this temperature. Even after sitting on a counter overnight, it was chewy (yank out your teeth chewy). I had to freeze it so I could cut snap into pieces. I hope I don't get bills for dental repair!!!!
This is a finicky recipe, but tasty! I would recommend the 'fudge' not the brittle. Easy to eat and yummy! Perfect when you have men folk around!!!
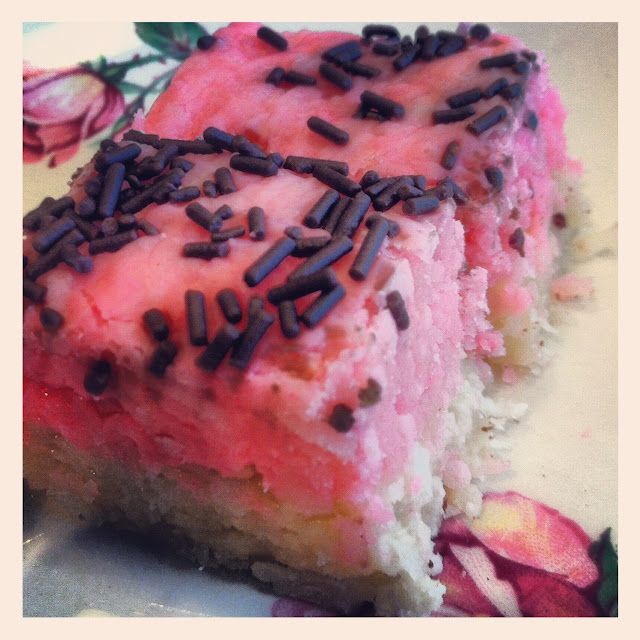
The last recipe was the Coconut Ice recipe from the March/April/May issue of 'Where Women Cook' magazine.
Don't you love these magazines?!?!
I wanted to try this recipe for months, but I didn't really want a ten pound tub of coconut ice! This was the perfect opportunity to try it out! If making for myself, I would probably halve the recipe.
Also I must add that I finally found a brand of shredded coconut which is peanut free!! I know what you're thinking…Coconut isn't a nut, and doesn't have peanuts in it!!! Unfortunately, the companies that bag/package coconut usually import and bag other items like nuts, and when you actually read the ingredients, they state that 'they may contain' or 'manufactured/packaged on equipment which also packages nuts'. If you don't believe me, next time you shop, check it out. Anyway, finally found that Sobeys private label doesn't have this warning. I called them and they confirmed it was safe! Great! On with the recipe!
COCONUT ICE (from Where Women Cook) by Koralee Teichroeb:
8 cups icing sugar
2 1/2 cups condensed milk
6 cups shredded dried coconut (WARNING-dont use sweetened!!)
1 1/2 tsp vanilla extract
pink food colouring
sprinkles
- combine sugar, condensed milk, coconut, and vanilla in a big bowl. Use your hands and mix/knead together until all ingredients blended well.
- Knead lightly on a icing sugar dusted board. Too much handling makes it stickier.
- Divide into two, and cover one half.
- Add a couple of drops of gel or liquid (I used gel) food colour and knead until its evenly blended. THIS IS HARD ON YOUR HANDS!!
- Press uncoloured half into bottom of a 9" x 11" baking dish covered with parchment paper and greased.
- Now add the pink in handfuls on top of the bottom layer. Place pats of the pink next to each other like a patchwork quilt, until the top is covered.
- Push down until top is covered and seems are invisible.
- If you are going to use sprinkles, add quickly and push down onto pink so it sticks.
- Cover and refrigerate overnight.
- Cut into SMALL pieces as they are VERY SWEET but good!
- Store in refrigerator for up to two weeks.
Next was the fun part!! Package them up in the mason jars, label, and pack up for school!!!
These were the three big jars for the home room teachers (1 litre jars). I used 500 ml jars for the other 23 jars! The smaller jars looked nicer!
Here they are ready to go!
Who wouldn't want a jar with a tasting of these sweets? All peanut/tree nut free!
I'm sharing with these lovely lovely blogs:
French Country Cottages' Feathered Nest Friday
Inspiration Friday at The Feathered Nest

a href="http://romantichome.blogspot.com/">


STRUT YOUR STUFF SATURDAYS at The Six Sisters Blog


I'm sharing with these lovely lovely blogs:
French Country Cottages' Feathered Nest Friday
Inspiration Friday at The Feathered Nest


